摘要:本文介绍如何在 Dify 中集成 Microsoft AI Search。通过配置自定义工具与 OpenAPI Schema,结合 Docker 部署的 Dify 环境,开发者可轻松调用 AI Search 索引数据,构建具备检索增强能力的 AI 应用。
Dify 与 Microsoft AI Search 集成指南(How to)
Dify 是一个开源的大语言模型(LLM)应用开发平台。它融合了后端即服务(BaaS)与 LLMOps 的理念,帮助开发者快速构建生产级生成式 AI 应用。
Dify 提供多种工具类型,包括官方工具和自定义工具。这些工具能扩展 LLM 的能力,例如网页搜索、科学计算、图像生成等。在 Dify 中,你可以打造更强大的 AI 应用。例如智能助手类应用,它能通过任务推理、步骤拆解和工具调用,完成复杂工作流。
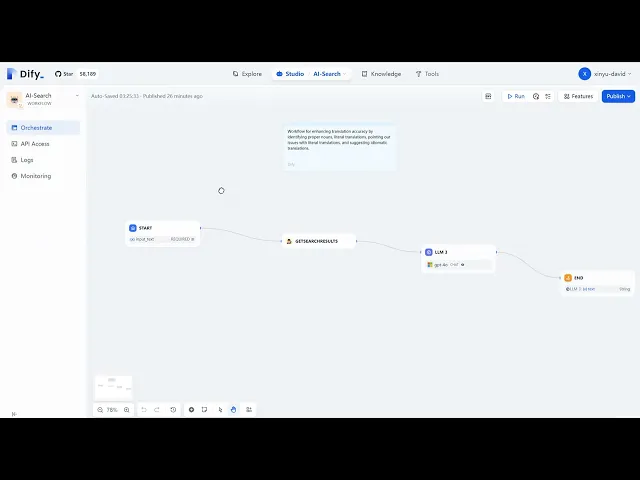
Dify 与 AI Search 集成演示
截至目前,Dify 默认控制台尚未内置 Microsoft AI Search 的直接集成选项。下面我将演示如何通过自定义工具实现对接。
请登录 YouTube 观看完整教程。
Dify 与 AI Search 配置步骤
1. 在 AI Search 侧完成配置
创建索引,并确保能通过 AI Search 索引成功检索到数据:

2. 通过 Docker 在虚拟机上运行 Dify
执行以下命令检查 Dify 容器运行状态:
root@a100vm:~# docker ps | grep -i dify
5d6c32a94313   langgenius/dify-api:0.8.3       "/bin/bash /entrypoi…"   3 months ago   Up 3 minutes   5001/tcp   docker-worker-1
264e477883ee   langgenius/dify-api:0.8.3       "/bin/bash /entrypoi…"   3 months ago   Up 3 minutes   5001/tcp   docker-api-1
2eb90cd5280a   langgenius/dify-sandbox:0.2.9   "/main"                  3 months ago   Up 3 minutes (healthy)   docker-sandbox-1
708937964fbb   langgenius/dify-web:0.8.3       "/bin/sh ./entrypoin…"   3 months ago   Up 3 minutes   3000/tcp   docker-web-1
3. 在 Dify 控制台创建自定义工具
进入 Dify 门户,创建自定义工具并配置 OpenAPI Schema:

Schema 配置详情:
{
  "openapi": "3.0.0",
  "info": {
    "title": "Azure Cognitive Search Integration",
    "version": "1.0.0"
  },
  "servers": [
    {
      "url": "https://ai-search-eastus-xinyuwei.search.windows.net"
    }
  ],
  "paths": {
    "/indexes/wukong-doc1/docs": {
      "get": {
        "operationId": "getSearchResults",
        "parameters": [
          {
            "name": "api-version",
            "in": "query",
            "required": true,
            "schema": {
              "type": "string",
              "example": "2024-11-01-preview"
            }
          },
          {
            "name": "search",
            "in": "query",
            "required": true,
            "schema": {
              "type": "string"
            }
          }
        ],
        "responses": {
          "200": {
            "description": "Successful response",
            "content": {
              "application/json": {
                "schema": {
                  "type": "object",
                  "properties": {
                    "@odata.context": {
                      "type": "string"
                    },
                    "value": {
                      "type": "array",
                      "items": {
                        "type": "object",
                        "properties": {
                          "@search.score": {
                            "type": "number"
                          },
                          "chunk_id": {
                            "type": "string"
                          },
                          "parent_id": {
                            "type": "string"
                          },
                          "title": {
                            "type": "string"
                          },
                          "chunk": {
                            "type": "string"
                          },
                          "text_vector": {
                            "type": "SingleCollection"
                          }
                        }
                      }
                    }
                  }
                }
              }
            }
          }
        }
      }
    }
  }
}
4. 配置 AI Search API Key
在工具设置中填入你的 AI Search API Key:

5. 执行搜索测试
完成配置后,即可在 Dify 中进行搜索测试:
